
Keyboarding for Happy Shoulders (and Necks and Backs)
In my Rolfing® practice, I see many clients with desk jobs who have concerns about their posture at work. I see a variety of strategies for how to position feet, butts, and backs, but very few people seem to be considering what their hands are doing. The keyboarding position most people use puts a significant strain on posture in such a way that it is often overlooked. While many people work hard to sit upright at their desks, I think it is generally impossible to achieve a fully upright and relaxed posture while using a standard keyboard.
The typical keyboard (even most ergonomically designed ones) place the hands inside shoulder width for the average adult. Where the hands go, the shoulders tend to follow. With the hands placed near the center of the body, the shoulders roll forward to follow them, often creeping over top of the ribs and driving the head and neck forward as well. Over time, more of the body can follow this hunching, leading to the creation of images like this:


 If we examine this positioning in contrast, you can see how the different positions of the hands affect closing or opening in the shoulders and chest. With the hands inside shoulder width, the chest collapses and the shoulders round forward (if you have trouble seeing this, consider the wrinkling in the front of the shirt). You can also see from the profile view how the shoulders slide forward significantly when the hands are placed close together. You can also try these positions yourself and feel the difference. Most people find the open position to be more relaxed and free but don’t think about it in daily life because they have habituated to the standard keyboard position.
While it made sense in the age of mechanical typewriters to set the keys as close as possible, the digital age offers a wider range of options with which we can adapt technology to fit our bodies rather than the other way around. There are options available now that can allow us to type while maintaining an open and comfortable hand and shoulder position, what I refer to in dance classes as a “natural shoulder angle”. The closer you can get your shoulders to this open position, the more room it will allow for full breathing, a relaxed neck, and for the shoulders to settle onto the back. To that end, I have been experimenting with the following options that allow for a fully open posture when using a computer. In all cases I found they produced a much more comfortable and engaged sitting position and often improved the flow of my writing once I had acclimated to the new position.
Dual Keyboards
 This is the cheap, easy, and accessible setup I suggest to people first trying out a wider hand position. The basic idea is that with the advent of USB keyboards, most computers can now accept input from multiple USB keyboards at one time. So, you can simply set up two keyboards and, assuming you can touch type, place your left hand on the left hand keys on the left keyboard and the right on the right keyboard. While it is not the most elegant solution, it gives you a lot of room to experiment and is a particularly cheap “tester” option which I usually recommend before committing to more pricey equipment.
Split Keyboard
 This is the keyboard I primarily recommend as a long-term solution. The Kinesis Freestyle2 keyboard is a fully split keyboard with a cord between the two halves. They offer a 9 inch cord or 20 inch cord option, I highly recommend the 20 inch as the 9 inch option is not enough to get my hands wider than shoulder width. While it can take a bit of getting used to, I found it relatively easy and intuitive to make the switch from touch typing with a regular keyboard and it is much easier to orient my hands to the two smaller halves versus trying to find the right position with the dual keyboard setup. I also find that I feel more productive and creative when typing on this for an extended period of time and experience a lot less fatigue in my neck and upper back. It also provides a lot of versatility for users of various shapes and if you get tired of the open position, you can readily slide the two halves together for use like a normal keyboard.
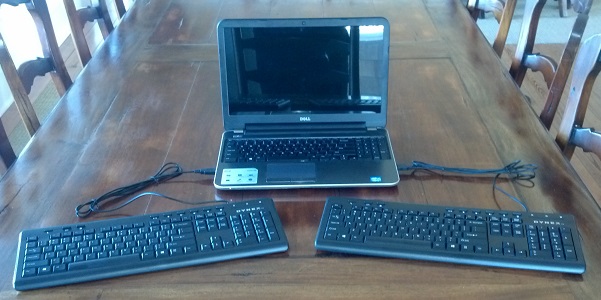
Keyboard and Laptop
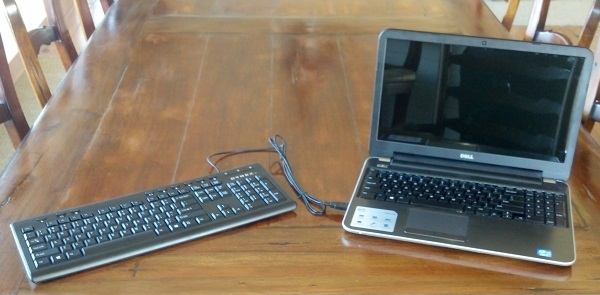 At this point, many people I know don’t even have a desktop computer and do most of their computer work from a laptop. If you are constantly travelling or working from various places with a laptop, you can cut down on clutter by using the laptop keyboard plus a single portable keyboard. Similar to the dual keyboard setup above, but with less desk usage and higher portability. While I used a hard keyboard for the photo, you could also readily use something more portable like folding or rollable keyboard. It does add a little bit of strain turning the head towards the screen, but it can easily be balanced by switching sides with the spare keyboard.
Whatever options you choose to use, my general suggestions are to think first about what positions your body feels ideal in and then look for ways to adjust your work environment to support those positions. Too often I see people struggle to maintain a comfortable posture simply because the tools they are using necessitate a more cramped position. The more you set up your environment to support good posture, the healthier your positioning will tend to be without always having to think about sitting up straight.
