Rolfer, Dancer, Teacher

Archive for the ‘Rolfing’ Category

Advanced Training in Brazil: Round 1 – Welcoming the Other Side

Rolfing Camp At The Beach to be exact

Rolfing Camp At The Beach to be exact

As I begin writing this, I am lying awake on my last night in Brazil after three and a half weeks of work and play deepening my relationship with my work as a Rolfer® and myself as a human being. It has been an intensely beautiful experience being here with a great many more twists and turns than I expected. Nonetheless I still find myself reverting back to the descriptor I’ve used the past 5 months when clients would ask what I was going to learn which is “It’s basically Rolfing Camp”.

And in many ways, it’s true. I just found this article by one of my classmates on the idea of Basics vs. Fundamentals (TL;DR – basics are easy and something you “get” and then are done learning them, fundamentals are primary ideas and skills that you can practice for the rest of your life). And in many senses of the word, I saw this Advanced Training course as a fundamentals class both for the students and the teachers. While the class for me was not tons of new information, it was a really good review and deepening of existing knowledge, getting to see it presented through the view of 30-year-veteran Rolfers which is something that never fails to leave me with new angles or ideas to think about.

The Basics of the Advanced

  • The training was held in the island city of Florianópolis, Brazil.
  • This was the first of two rounds of 3 week apiece, 4 days of class, 3 days off per week.
  • Class was taught by Lael Keen  with Karen Lackritz assisting.

    Our classroom for the training

    Our classroom for the training

  • Lael and Karen taught primarily in English with a translator, Dieter, translating to Portuguese with assistance from the class, the majority of whom were at least bilingual in English and Portuguese.
  • There were 8 other students, 2 Americans and 6 Brazillians, all female. It made for a curious book-ending of this year with the Scarwork class I took in January and this class in November being cases of me in a class of all women.
  • The general format of class was covering material (feet, spine, anatomy, functional movement, practicing techniques, etc.) for the first 3 days each week, then watching both Lael and Karen do a demo of a full session on an outside client (two other Advanced Rolfers from the local area), then Thursday afternoon each week we traded a session with a classmate for a series of 3 sessions.

    MONKEYS

    ERMAGHERD, MONKEEES!!!

  • In my experience, Brazil has also been particularly amazing at feeding classes, so we had coffee/tea breaks in the morning and afternoon and for the class days we had hired a local chef, Tito, to prepare lunch as well.
  • There were monkeys at my house that would come begging for bananas. They only want bananas and will give you funny looks if you try to give them mango instead.

Structure and Function and Function and Structure

One of the first things I recall seeming important to Lael’s class plan, and one of the things that drew me back to Brazil, was a strong emphasis on the inter-connectedness of structure and function. Or perhaps more accurately, a clarifying that structure and function exist in a co-dependent fashion and one cannot affect one independent of the other. While all the Rolfing training I have received has worked with form and function together, the trainings I have been to in Brazil somehow seem to take it a little deeper or make that relationship a bit more of a primary focus than some of the trainings in the US. And the primacy of it in this course helped me gain some better insights into when it might be more effective to start approaching an issue with a structural intervention vs a functional one.

Mr. Bean, the class pet, attempting to establish dominance, or maybe just do some back work on me

Mr. Bean, the class pet, attempting to establish dominance, or maybe just do some back work on me

The deeper focus on relationship to the world as an influence on movement is another of the big reasons I chose to come back to Brazil for my Advanced Training. In 2008, I had chosen Unit 3 training in Brazil in part because I expected the Movement Training to help me be a better dancer. It ended up leading me to entirely rethink my ways of teaching dance and create an approach that was radically different from how I’d learned to dance originally. And that energy of relationship was borne out in this class as well, with the techniques we practiced in the body leading to a broader question of “How does what we are doing help our clients or ourselves relate to the world?”

Lots of Review, Tidbits of New

In general I found the material to be more review and deepening of information I’d encountered before. Some of that may be that I took unit 3 from Jan Sultan who is one of Lael’s primary influences as a Rolfing instructor. Nonetheless, the training was a great chance to review, dive into material through a different instructor’s perspective, and pick up details I missed in prior trainings. In general I felt like I deepened my understanding of some fundamentals and picked up some good bits of information:

  • Ida Rolf used to carry a question for students of “Where would you work if you could only work on one spot in the body?” and her answer for herself was the 12th rib.
  • The lateral arches of the feet support the medial arches, Lael had some great anatomical slides and illustrations for this which I had not seen before.
  • A general review of spinal mechanics gave me some points about the vertebral facets to think about which I had lost track of somewhere in the last few years.
  • Time spent digging into the concept of hapticity (or the more-fun-to-say hapticidade in Portuguese), a sort of combination of sensing and moving at the same time and letting the two influence each other. One of those fundamental skills that I expect to be developing and deepening for the rest of my life.
  • Some new-to-me ideas from Lael about using interpersonal relational tactics to help clients integrate movement options into their interactions with the world.
  • We got a fairly high-level introduction to Ron Murray‘s  work with Lemniscate  movement which I haven’t explored much with clients, but am interested in exploring deeper at some point.

Third Week Openings

There is a curious energy that arises with these sort of longer-form trainings. I’ve only experienced it as a student so far, not as a teacher, so I don’t have a complete picture but there seems to be a quickening of transformation that occurs. I have often said that one of the things I loved about competing in dance was that involving the energy of a support crowd clapping and cheering can spur dancers on to a level they rarely or never achieve on their own. And I find something similar happens with Rolfing trainings as though the combined group’s energy supports us changing or growing in ways we might not have on our own.

This energy seemed to be in full swing by the third week of training. Lots of us were having some very deep and meaningful shifts in our ways of being. Some blossomed, some struggled, I experienced an incredibly vulnerable heart opening moment in front of the class where I’d pulled away from a similar moment in my Unit 2 training 7 years ago. One of the instructor demo sessions involved a client reliving the birth of her child via C-section and I cried as my own pelvis mimiced the release patterns of the woman on the table. Even the class format itself shifted mid-week to accomodate a need for more integration time amongst the bodies in the classroom.

Outro Lado – Welcoming The Other Side

In the final week of class I was thinking about how to identify a theme to the whole module and the words that came to mind were “outro lado”, Portuguese for “other side”. Those words stuck as a good descriptor for the shifts I had watched occur in myself, classmates, and even translators and teachers over the prior two weeks. Each of us delving into some other side of our personalities or our work that diverged from our normal preferences but brought us into a greater potential for balance and adaptability. And it came with a gentleness and acceptance that I could only put together as “Welcoming the Other Side”.

Living_room_mural

The house I rented during the traing happened to be owned by a local artist who had decorated the house with carvings, murals, and various canvases. The great feature mural of the house was one of the living room walls which boasted an entire wall painted with the mural above, reinforcing that idea of the other side for my experience of Brazil. On my last day in Brazil as we had breakfast and chatted about the house he mentioned that he had completed the mural in a day and had always wanted to go back and finish it. I shared the idea I had heard that a painting is never completed, you simply stop working on it (apparently the quote is typically translated “Art is Never Finished, Only Abandoned” – Leonardo DaVinci).

WatercolorWe diverged into discussing the course and how Rolfing is like watercolor in the sense that you take a stroke, then leave it alone for a while allowing the colors to bleed out into the person’s life, then repeating the process session by session. My host thought for a moment, then disappeared into his workshop as we were leaving, returning with this beautiful watercolor as a gift to mark our discussion. Being unprepared to transport paintings and having no suitably large books, I managed to get the painting safely home, tucked between the keyboard and screen of my laptop.

As I’m finishing this post it’s the beginning of January, just over a month since I boarded a plane home from Brazil. It seems at once very recent and yet long ago and far away that I was sitting down to Thanksgiving dinner with my classmates on the last day of class (yes, we graduated Round 1 on what would be Thanksgiving Day in the U.S.). Brazil took me deeper than I expected in directions I had not anticipated, but it has definitely left it’s mark in ways that continue to improve my work with clients and my relationship with my own body. I’m looking forward to further explorations, new inquiries, and super grateful to be returning for Round 2 in April!

Finishing the Training with Turkey

Finishing the Training with Turkey

Working with the Space Between Spaces: Explorations in Wholeness Class Review

One of the keystones of my growth as a Rolfer so far has been getting a sense of more tissues in addition to fascia and working with how they relate to each other. As I’ve grown more competent and comfortable with the variety in the body, I find my sense of the space between them growing deeper and more refined. So when I saw the listing for Thomas Walker and Gale Loveitt’s Explorations in Wholeness class it read like a class totally up my alley and a great way to deepen my use of those “spaces between the spaces”.

I did my Unit 2 basic Rolfing training with Thomas and he was a strong influence in developing the lighter side of my Rolfing touch and listening skills. The basic training in Rolfing was an excellent grounding in finding what this class might call “the hard stuff” muscles, bones and the like. Explorations in Wholeness added a depth for me of finding and feeling into “the soft stuff”, helping me find a way to contact softer parts of the tissue or anatomy more prone to hiding and finding ways to influence the body to connect more or to rediscover connections that past experience had disrupted in some fashion.

The essence of this class lay in working with various craniosacral rhythms. It’s not an area I particularly understand well nor am I sure the technical details would be helpful for everyone so I’ll relate it to my image of choice for the class which was ocean tides and waves. There are individual waves in the ocean breaking nearly every second on the shore, there is the cycle of high and low tide twice daily and in between these there is that middle cycle where the individual waves are washing higher or lower than the previous waves upon the beach every minute or two.

The work is… challenging to describe and honestly, my initial reaction was to resist naming it or calling it anything particular lest I narrow the potential of the work into some set box. That said, I also like to be able to communicate thing with more than just shrugging and saying “it seems to work” so I’ve tried to break out some ideas of how I describe this work to clients and how I might describe it to other practitioners.

For Clients

Every so often, as I grow as a practitioner, I encounter the idea that the ultimate goal is not for me to fix anyone, but for them to help engage their own healing mechanisms. Those are the kind of results I generally saw and felt with this work. Clients who I had worked with for several years seemed to notice me suddenly finding things at a deeper level, I honed in faster on where to put my hands with newer clients, and for my first week or two back almost everyone drifted to sleep at some point during their session.

I’ve also tried this work a few times with some very long-term clients and found it helps them access a level of strength and organization that they weren’t able to previously. I recently felt drawn to try a full session of this work with a client who I felt didn’t believe in her own inherent wholeness. The result was a deeply challenging session that stirred a lot of old feelings and hurts but several days later her whole sense of being had softened, she seemed more settled in her body, and some of her more kinetic energies had found a way to chill out.

From the client side, I think this work helps tap into a depth of calm in the nervous system that’s often hard to achieve in today’s world without going deep into the woods or far out to sea. It’s essentially providing a safe and supportive space for the brain to cool down and get out of the way and a sort of deep relaxation to come into play and help reorganize patterns of movement which in turn can build into lasting changes in how we hold and present ourselves and how we relate to our own stress.

For Practitioners

As I listened to the stories of Rolfers in this class I would say I found a theme of searching for something. A number of the newer Rolfers in the group talked about struggling to know what to do with clients where a number of those trained further back talked about looking for something softer, less “hammer and tongs” in our work. How to be effective when “mashing fascia” isn’t your bag or what to do when you don’t know what to do.

My impression going into the class was that this work would be a way to help bridge between layers, to work on the spaces between the spaces. And to be sure, there is a great deal of that in the work and it’s helped me find some ways into things, both structural stuckness and functional inhibitions that I didn’t have a tool for before when I was thinking of more specific tissues. In a fairly exacting sense, the work is about contacting fluid more than tissue, allowing not just for working into specific areas but also working with the uninterrupted wholeness of the body. It also involves a sort of stillness and patience that I find greatly aids in asking questions of the tissue and letting the body lead me into helping rather than feeling like I have to go in knowing where things need to move.

Fish-to-manIn a sense the work remains mysterious to me, albeit effective. I’ve struggled for several months to find an elegant way to say what I think I’m doing with this work currently but I finally hit on it in my first Advanced Training Module. I found myself wanting to do a full session of this work on a model client and since neither of the instructors were familiar with the work I was scrambling a little to describe just what in the hell I was after. The lead instructor, Lael Keen, had made several statements earlier in classes about working with ligamentous beds as “speaking to the dinosaur intelligence of the body”. Standing in front of the class trying to give an idea of the session I intended to do I finally came up with “I want to speak to the fish that existed long before the dinosaur”.

And Space to Grow…

Where many of the classes I have taken in my career have been fairly easy to describe, this work continues to almost defy my desire to describe it. It seems that I almost feel more effective in the work when I allow it to remain mysterious and exploratory rather than fixing a description or expectation to it. The essence of it seems to be in attention and allowing, skills that are at once inherent in all of us and yet can also be honed to greater depths or wider scopes. Thomas made mention several times of how after 20 years it still amazes him how a shift in himself can result in a deep change in a client.

While I do like to be able to understand what I am doing when I put hands on a client and why it works, I sometimes find myself eschewing understanding and paraphrasing Arthur C. Clarke: Any sufficiently advanced technique is indistinguishable from magic. I don’t think this work is magic per se, but my short experience with it is that allowing it to seem magical made it more effective. The mystery allows space, the space allows exploration, and the exploration allow growth of skill to occur.

And in much the same way that the class focused on ease and allowing, the growth and integration into my work seemed to happen similarly. I’ve made pretty minimal effort to directly practice the work in the past few months but the last time I worked on one of my office-mates her immediate response was “You’re doing something really different. Your approach to the body has changed, like you’ve gotten out of your own way.” I suspect there is a great deal deeper I can go with this work but one of the things I really value about it is how it seems to blend across lines of different techniques and both deepen my current practice while also offering new avenues to explore and tools to continue exploring.

Scar Tissue Workshop with Sharon Wheeler review

In the past years, I’ve noticed the strongest trend in my Rolfing continuing ed and the one I’ve benefited most from is adding tissues to my repertoire. So about a month ago when a space opened up at a nearby (or at least within driving distance) workshop with Sharon Wheeler on working with scar tissue, I jumped at the chance. And boy am I glad I did because adding Sharon’s Scar Work to my skillset has already helped a lot of clients in the intervening two weeks and given me some new insights into how the body heals.

About the Workshop

Curiously, I wound up being the only male in a class of 15 women (including the instructors and assistants). I don’t gather this is the norm, but it was a curious experience given that most of my basic trainings in Rolfing were heavy on masculine energy. That said, the workshop was in many ways, exceptionally well suited to my kinesthetic learning style, a half day or so of demonstration, followed by 3 rounds of working on each other and then in a team fashion working on model clients, giving us the ability to rotate at will between clients, observe and attempt working on different scars, and stand back to watch when we felt moved to. If you learn well from a relatively unstructured environment, like getting your hands dirty in class, and want to work with your classmates as peers, I’d highly recommend Sharon’s teaching style.

About the Work

The work, I found kind of fascinating. Without going into too much detail, I describe it as very very light sweepy and scrubby type of work. In my head, I refer to it more as “noodling around” than “work”. I’m sure there are at least a couple layers of sophistication I still have to develop with it, but so far it’s been surprising how immediately it is possible to be effective with this work. Scars soften, mobility is improved, areas begin to feel integrated, and often sensation returns to areas that many clients have referred to as feeling not a part of them or dormant. And all of this with no pain and a very oppositional approach to the “you have to break it up” approach that I typically hear in regards to scar tissue.

Why I Think it Works

Sharon made it clear that while she has found this style to work for 40+ years, she’s not entirely sure why it works although they are starting to do research on it now. Because I tend to be a non-linear thinker and like to draw connections, I let my mind wander on the “why does it work” question throughout the workshop and came up with the following ideas. Note that this is just my working theory, nothing proven and subject to change as I go deeper into this sort of work.

My first impression was that it seemed like unlocking or restarting time in the body. The work seems to be similarly effective with recent scars as well as very old scars and in most cases the scars seem to soften and begin to blend in with the surrounding skin and, in a number of cases, nerve function seemed to return almost immediately. It’s almost as if the tissue reaches 80% or 90% healed and then somehow had gotten stuck, almost like it were cryogenically frozen mid-healing and the scar work thaws it back out and allows it to complete.

The working theory that I’ve developed around it is that the work seems to simulate licking wounds (albeit without the saliva). Most mammals seem to do this and while it’s typically explored as a method of cleaning, it seems possible to me that in the course of evolution, tissues have evolved to respond to licking by healing further and integrating better with the “original” tissues around them. While I don’t have evidence to support that theory, it does seem to make a certain level of intuitive sense to me and to most of the clients I’ve shared this theory with.

What I’ve Done With the Work

In the 3 weeks since the workshop I’ve played with a lot of different ideas and seen some great results with some general trends. Here are a few of the things I’ve been able to create with the tools from the workshop.

  • Worked on several C-section/hysterectomy/etc. scars. Saw hips find more neutral tilt and spinal/sacral tension on the opposite side tend to relax more or easier.
  • 2 appendectomy scars, both of which softened significantly and were able to twist through the torso more readily along with releases in back and hip tension.
  • Worked on my own circumcision scar. Found that the tissue softened a good amount, there were numerous signs of nervous system release in my body (stomach gurgling, shaking, etc.) and since then the tissue has been both softer, more sensitive, and I have experienced a distinct ease and better functioning in my pelvic floor.
  • Started recovering a divot in a client’s breast left over from a lumpectomy 8 years prior. The client had also been unable to feel her armpit by the breast since her cancer treatment and left with sensation restored to the area.
  • Worked with a 3x operated on ACL replacement for a soccer player who had been having trouble with it since the first surgery. After 2 sessions, reports that the knee is much more mobile and feels stronger than the leg that has not been operated on.
  • Starting to reassemble cartilage in my own right ear which was shattered in high school when I got cauliflower ear in wrestling. I’ve felt several pieces of cartilage “pop” back into place kind of like I’m shifting tectonic plates back into an alignment and my hearing in that ear has improved after a week or so of the ear going through a phase of feeling plugged up. Still some work to do there, but it seems to be making progress.

I’ve worked on a variety of other small scars in the meantime as well and in almost all cases I noticed that clients seemed to settle in on a deeper level after the scar work than I had typically seen them settle in past.

All in all, this has been a great style of work to add to my toolbox. It’s allowed me to help clients further resolve, heal, and integrate a variety of scars on both a physical and, in some cases, emotional level. Integrating the scars seems to make them more mobile, even out the color with surrounding skin, and allow for better structural work in and around the areas. I think it’s an excellent addition to helping people heal old wounds, fully resolve surgical interventions, and in some cases, recover nerve function that they were told might never return.

Many thanks to Sharon for sharing this work and being a gracious teacher. 🙂

Keyboarding for Happy Shoulders (and Necks and Backs)

In my Rolfing® practice, I see many clients with desk jobs who have concerns about their posture at work.  I see a variety of strategies for how to position feet, butts, and backs, but very few people seem to be considering what their hands are doing.  The keyboarding position most people use puts a significant strain on posture in such a way that it is often overlooked.  While many people work hard to sit upright at their desks, I think it is generally impossible to achieve a fully upright and relaxed posture while using a standard keyboard.

The typical keyboard (even most ergonomically designed ones) place the hands inside shoulder width for the average adult.  Where the hands go, the shoulders tend to follow.  With the hands placed near the center of the body, the shoulders roll forward to follow them, often creeping over top of the ribs and driving the head and neck forward as well.  Over time, more of the body can follow this hunching, leading to the creation of images like this:
evolution_of_man_ape_to_computer

Front_view_hands_close_and_openSide_view_hands_close_and_open
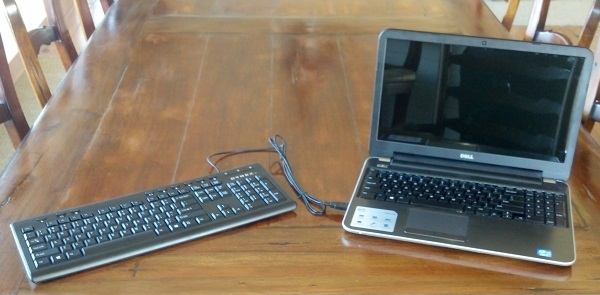
If we examine this positioning in contrast, you can see how the different positions of the hands affect closing or opening in the shoulders and chest.  With the hands inside shoulder width, the chest collapses and the shoulders round forward (if you have trouble seeing this, consider the wrinkling in the front of the shirt).  You can also see from the profile view how the shoulders slide forward significantly when the hands are placed close together.  You can also try these positions yourself and feel the difference.  Most people find the open position to be more relaxed and free but don’t think about it in daily life because they have habituated to the standard keyboard position.

While it made sense in the age of mechanical typewriters to set the keys as close as possible, the digital age offers a wider range of options with which we can adapt technology to fit our bodies rather than the other way around.  There are options available now that can allow us to type while maintaining an open and comfortable hand and shoulder position, what I refer to in dance classes as a “natural shoulder angle”.  The closer you can get your shoulders to this open position, the more room it will allow for full breathing, a relaxed neck, and for the shoulders to settle onto the back.  To that end, I have been experimenting with the following options that allow for a fully open posture when using a computer.  In all cases I found they produced a much more comfortable and engaged sitting position and often improved the flow of my writing once I had acclimated to the new position.

Dual Keyboards

Dual_KeyboardsThis is the cheap, easy, and accessible setup I suggest to people first trying out a wider hand position.  The basic idea is that with the advent of USB keyboards, most computers can now accept input from multiple USB keyboards at one time.  So, you can simply set up two keyboards and, assuming you can touch type, place your left hand on the left hand keys on the left keyboard and the right on the right keyboard.  While it is not the most elegant solution, it gives you a lot of room to experiment and is a particularly cheap “tester” option which I usually recommend before committing to more pricey equipment.

Split Keyboard

Kinesis_KeyboardThis is the keyboard I primarily recommend as a long-term solution.  The Kinesis Freestyle2 keyboard is a fully split keyboard with a cord between the two halves.  They offer a 9 inch cord or 20 inch cord option, I highly recommend the 20 inch as the 9 inch option is not enough to get my hands wider than shoulder width.  While it can take a bit of getting used to, I found it relatively easy and intuitive to make the switch from touch typing with a regular keyboard and it is much easier to orient my hands to the two smaller halves versus trying to find the right position with the dual keyboard setup.  I also find that I feel more productive and creative when typing on this for an extended period of time and experience a lot less fatigue in my neck and upper back.  It also provides a lot of versatility for users of various shapes and if you get tired of the open position, you can readily slide the two halves together for use like a normal keyboard.

Keyboard and Laptop

Keyboard_and_LaptopAt this point, many people I know don’t even have a desktop computer and do most of their computer work from a laptop.  If you are constantly travelling or working from various places with a laptop, you can cut down on clutter by using the laptop keyboard plus a single portable keyboard.  Similar to the dual keyboard setup above, but with less desk usage and higher portability.  While I used a hard keyboard for the photo, you could also readily use something more portable like folding or rollable keyboard.  It does add a little bit of strain turning the head towards the screen, but it can easily be balanced by switching sides with the spare keyboard.

Whatever options you choose to use, my general suggestions are to think first about what positions your body feels ideal in and then look for ways to adjust your work environment to support those positions.  Too often I see people struggle to maintain a comfortable posture simply because the tools they are using necessitate a more cramped position.  The more you set up your environment to support good posture, the healthier your positioning will tend to be without always having to think about sitting up straight.

In Defense of the Rotator Cuff

This post is being written at the request of a lovely Aussie follower who has suffered multiple rotator cuff tears in the course of her dance life. While not all dancers suffer from rotator tears, it’s a fair bet that almost every dance will run afoul of their shoulders at some point. The following ideas should help you minimize your chances of injury in those moments of potential crisis. Note that while I will give some specific lead or follow examples, all of these should hold mechanically true for both leading and following.

A quick note before anyone jumps up to tell me that their instructor told them to do it differently, I’m speaking here from a biomechanical and injury-proofing standpoint, not an aesthetic or stylistic standpoint. I personally find that solid body mechanics tends to translate to great aesthetics for me, and I try to base my dancing first and foremost on things that I think will allow me to keep dancing for the rest of my life. These are the best safe & effectively connecting body mechanics that I have come up with in 11 years and if I develop or encounter a better idea, I’ll definitely post about it.

Anatomy Time!

rotator cuffThe rotator cuff is the group of muscles connecting the top of the upper arm bone (humerus) to the shoulder blade (scapula).  The reason these are important is that the shoulder blade is a relatively mobile and therefore unstable joint. The surface of the shoulder joint (glenoid fossa) is essentially a very shallow bowl that has been overfilled with the head of the humerus. This makes the joint very mobile, but also vulnerable to sliding around or out of the socket (one of the reasons shoulder dislocations are far more common than, say, hip dislocations). The muscles of the rotator cuff are all oriented closely around the joint to rotate the humerus in the joint, provide stability, and protect against injuries like dislocations.

Dancing Based on Natural Angle

Based partly on the rigors of modern life, most of us have become habituated to some less-than-natural positions for our arms. The arms-straight-ahead position that most of us spend a lot of time in (driving, typing, etc.) rolls the shoulder in a way that compresses the front of the joint and, over time, tends to make the shoulders stick forward even when our arms are at our side. Many people, either by instruction or habit from daily life, learn to dance with their arms straight in front of them, reinforcing this compression, and putting the shoulder in an unstable position to deal with strong pushes or pulls. I feel that opening the shoulder up to a neutral and balanced position makes it both more stable and far more functional at handling the demands of swing dancing.

To reacquaint yourself with this position, first hold your arms up around belly button height then slowly move them from reaching straight ahead to straight out to the side. As you swing through this range, you should notice that the level of tension in the shoulder lessens as you move towards the middle of the arc, hits a point of minimal tension, and then the tension starts to increase as you continue towards the end of the arc. You should also notice the position of tensions shift as you pass to either side of that middle point. This point of minimal tension is what I refer to in classes as the natural angle of the shoulder. It is the angle at which the rotator cuff is most relaxed and therefore most able to react to various forces. The exact angle varies from person to person but typically falls somewhere between 30-60 degrees from straight out front and places the hands in a position wider than the shoulders.

When I’m dancing, part of protecting my shoulder is that I consider this angle to be home base for how I orient to my partner. I remember as a newbie being taught things like spotlighting or to “square off” to my partner and it always felt a bit forced. I have found orienting myself to my partner based on the natural angle of my shoulder to be far more connected and comfortable and consequently safer for my shoulder. My hand and arm move to follow or lead my partner and I adjust the angle of my body to keep my shoulder in an open, relaxed and ready position. It can be counter-intuitive to the way many of us orient to our hands, but once you get used to it, it should make a lot of sense for your body.

Chest Up, Shoulders Down

The other typical position that can compromise the rotator cuff is the overhead lift of leading and following turns. Many dancers don’t just bring the hand and forearm up when they turn, they also raise the shoulder blade. Lifting the shoulder blade off the ribs puts the shoulder in a vulnerable position by disconnecting it from the support of the ribs. Without the support of the ribs, it becomes much easier for a pull at the wrong time to bend the shoulder into an angle that will injure it. I have found the next two concepts to be exceptionally helpful in keeping the shoulder in a safe position during spins and turns.

Paint the Fence (aka NO ROTATION)

???????????????????????????????????????????????????????????????????????A common stressor that many dancers put on their shoulder is trying to rotate it out as they lift. While I realize it is a fairly common cue, I find the “checking your watch” method of leading turns does not make kinesthetic sense to me. Rotating the arm to look at your wrist forces the elbow above the shoulder blade which then pulls the shoulder up with it. The more the elbow flairs away from the body, the more the shoulder separates from the ribs, reducing both stability and connection.

A far more effective method of raising the arm comes in an approximation of Mr. Miyagi’s paint the fence exercise from The Karate Kid (the original, not the remake). Keeping with the natural angle of the shoulder, the motion of the arm is basically just “Uuuup…, Dooown…” and the torso moves to create the turn.

[youtube http://www.youtube.com/watch?v=R37pbIySnjg]

Unlike Daniel-san, for dance purposes you’ll want to let your elbow be loose, relaxed, and weighted so that it stays low as your arm comes up. But notice in the motion of the movie that this is a whole body motion. You can see the muscles of the chest flex and relax with the motion and you should be able to feel them activating. If you try to same “look at your watch” motion, and feel your pecs, you’ll notice they have almost no activation. Keeping the arm rising and falling and making adjustments with the torso rather than the shoulder rotation will put you in a much safer position and typically keep you more connected to your partner (which also helps you be safer). By maintaining the connection of the arm to the torso, you can also effectively lead turns by initiating small rotations from the chest and spine rather than large motions from the arm.

Scapula as Counterweight (or Turns and Trebuchets)

The other issue I often see putting shoulders in harm’s way is the tendency to think that everything needs to go up. People become so focused on their hand that they forget there is a wrist, elbow, shoulder, and ultimately, spine attached to that hand. So if your only awareness is the hand needs to go up, everything else in that chain tends to go with it. Again, the shoulder rises and you are suddenly in the vulnerable position of having your hand above your head with only your rotator cuff actively holding the shoulder in the socket.

trebuchetWhat has served me best is to bring an awareness of my shoulder blade and to think of it as a counterweight to the arm, similar to but not quite as unbalanced as the counterweighting found in a trebuchet. When I want my arm to rise, I don’t think about taking my hand up, but rather, I think about initiating by allowing the scapula to slide down (inferior) my back and away from my head. This serves to stabilize the shoulder in several ways. One, it insures that my arm does not come up without my scapula being solidly in touch with my ribs and it additionally eases some of the effort of lifting my arm, meaning my hand goes up with less muscular effort and I have more freedom to adjust in case of emergency. One of the easiest ways to experience this is to stand with your back against the wall and try both lifting your shoulder blade as your arm rises or letting it slide downward as your arm rises. With the downward slide, you should feel more of the engagement in your chest and back and your arm should feel much lighter and floaty than when you lift the shoulder blade with it.

incline_pulleyThe counterweight idea is not only useful for turns, but can also be applied to protecting the shoulder from collapsing forward when stretching out in swingouts, tossouts, rocksteps, etc. In a stretch where the arm is not going to come up above shoulder level, think of the shoulder blade as a counterweight to the front of the chest and allow the chest to rise and open as the shoulder blade descends. In the inclined pulley illustration, think of M as the shoulder blade and m as the arm. So long as M is weighty enough, it will resist being pulled up and over the top by m. But if the force of m wins out, then the shoulder blade (M) will be pulled up over the top of the pulley and it will all tumble down the slope. By letting your shoulder blade remain weighty when stretching (at a natural angle) it will prevent a lot of potential strains and sprains that can occur from collapsing and hyper-extending the shoulder.

Keep it Personal

There is no one right way to do this. There is a great deal more variability in human anatomy that a typical textbook will not show and as such, there is a great deal of variability in function as well. The safest angle for one dancer may feel very unstable for another and so on. The more you can create ease in your body, the more ready your muscles will be to keep itself in safe and comfortable positioning. Similar to the non-Newtonian frame concept, the more you are in a fluid, rather than rigid, state to start, the more readily you will be able to react both to potential threats and to communications from your partner. In addition, the safer your body position feels, the more it will free up your attention to try more awesome things. Use the above as suggestions to play with your own angles and ways of conceiving of motion and use whether it feels more tense or less tense as the metric for more vulnerable or less vulnerable.

Making Better Use of Your Lats

It’s another one of those often used, but tough to execute, pieces of advice, “use your lats.” I hear it a lot in the swing dance world and in the fitness world and while it seems to be a simple idea, many people struggle with it. Often, the issue is not that the lats aren’t active, but that other muscles are preventing the lats from fully activating. So here’s a quick run-down on how you can gain better access to this muscle.

lat-extensionWhat are Lats?

Just a quick definition for those of you unfamiliar with them, your lats, or latissimus dorsi, are the main power muscle involved in retracting the arm from an extended postion.  So if you are is out in front or above you (flexion) and you want to pull it into back towards a neutral position by your side (extension), that’s the job of the lats. The lats are also used for a few other movements but pulling in (extending from flexion) is a primary issue in dance and athletics.

Extending to Activate

When attempting to engage their lats, most people (and most of their instructors, coaches, trainers, etc.) try to go at it directly. “Find your lats and squeeze them” can work, but most people struggle with this version. I have found that taking a more 3-dimensional, indirect approach helps many people to more effectively engage their lats, allowing them to get greater power and range of motion out of the muscle.

The basic idea is to think about expanding the muscles of the anterior (front) chest and sides (pectoralis major, pectoralis minor, and serratus anterior). Instead of focusing on your back and trying to squeeze from there, put your attention on the front of the body and allow the chest muscles to expand as you pull. Rather than initiating from the back, imagine the force starting from the chest and wrapping around and under the armpit and through to the low back. As you do this, be aware of the head and neck which have a tendency to push forward in response; keeping the head upright will help the chest to expand, enhancing the engagement of the lats.

wide-lapels-bow-tieIt also helps to work on keeping the space around the clavicles (collar bones) spacious and wide.  Imagine wearing a jacket with extra wide lapels that extend into the space of the shoulders.  The more the shoulders settle wide and back, the more it will help you to engage the lats when using your arms.

Why Extension Helps

The rigors of modern life (computers, driving, etc.) frequently put us in an arms forward position for extended periods of time. This means that their chest muscles are often stuck in a contracted position. As a result, many people become habituated to a posture that involves some level of collapsing in at the chest.  So when they attempt something like a lat pull or retracting in from extension, the anterior chest muscles tend to stay contracted.

metal-pulleyThis contraction of the front muscles causes an inhibitory effect in the lats. This response, known as reciprocal inhibition, causes muscles with opposing actions to be prevented from contracting at the same time. Similar to how you can only move a pulley rope by pulling on one end at a time and allowing the other end to move, a joint only moves effectively when muscles on one side expand, giving the opposing muscles room to contract. By focusing on expanding the chest, you allow room for the lats to contract and prevent the reciprocal inhibitory effect.

Beyond Just Lats

This expansion tactic can be used to aid in movements throughout the body. By lengthening the antagonist muscle to a movement, you can provide more space for the acting muscle to contract, adding to both potential for power and mobility. The more you work with activating your body in a 3-dimensional fashion this way, rather than isolated muscles, the more freely you will be able to move across all your joints. So the next time you are having trouble executing a motion, try finding the opposing muscles and allowing them to expand, using space over effort to move.

This Music Sucks: Personal Movement Style in Dance Music Appreciation

SwingSucksAlbumCoverI recently DJ’d a 20’s themed holiday party where my partner and I had been hired to teach a Charleston lesson and follow up with 20’s music, eventually transitioning into modern pop music. Due to a  few delays, and performances running long, we were eventually asked to scrub the lesson and move straight into playing music. Within the first song or two of 20’s music we immediately had people coming up to not-so-subtly ask when we would start playing modern music. The subtext of the request was pretty clear “We think this music sucks.”  We scrambled a little bit, threw on some club type music and the once empty floor was suddenly packed.

The variety of perceptions people have for the same tune was always been intriguing to me. It amazes me that someone could love the Cupid Shuffle or hate Jumpin’ at the Woodside. I was aware that I started dancing liking Neo-Swing but as my dancing grew I started to prefer first groove, then vintage, but I didn’t have a solid reason why. I’ve heard some great talks on this subject, from a musical perspective, by DJ and historian, Kyle Smith, and I’m in absolute agreement that there are a lot of factors to how we perceive music. For this post, I wanted to pick out one that I see as a particularly strong influence in what people will or won’t dance to: their own default movement.

All of us have our comfort zone and at the center of that comfort zone is our default. If we count ourselves off, we each tend to count off at a certain speed, syncopate a certain way, use a particular energy, etc.  If every song sounded the way that default song does, we would kill it every time we hit the dance floor.

Of course, not every song fits our comfort zone.  The vast variety of music defies our comfort zone, falling somewhere away from our default towards uncomfortable, or even inaccessible territory.  And this is where I think a breakdown occurs for a lot of people.  When the music no longer supports the way your body wants to dance, you have two choices, recognize the limitations of your body or blame the music.  I think the common “I don’t like this music,” is often an indication of people choosing the latter.

This isn’t to say that all music preferences are based in this, but whether or not the music supports your movement is something I don’t see many people pay attention to.  So in an out of sight, out of mind sort of way, it makes it easy for our comfort zone to flavor a lot of our stated musical tastes.  If your movement and the music don’t have a common thread to them, it begins to make dancing feel like an inappropriately soundtracked movie scene.

From the musical side, this is how I tend to approach things when I am DJing and want to fill the floor regardless of what music it takes (as opposed to wanting to play within certain genres).  I watch the way people move, particularly when they aren’t dancing, and try to figure out what would make an appropriate soundtrack.  I think most DJs do this to some extent when they talk about reading the floor.  Coming up with someone’s soundtrack is just one of the ways I conceive it and a way I have found translates well when helping new DJs develop their own feel for the floor.

Sometimes the music is just bad.  But most of the time, I try not to be like this guy.

Sometimes the music is just bad. But most of the time, I try not to be like this guy.

As a dancer, I certainly have the option to just stick to my guns that X music sucks and not dance to it.  But I would prefer to dance more and dance better to the music I already like.  So from that perspective, my goal becomes expanding my movement repertoire and getting better at moving based on the music rather than moving based purely on my preexisting habits.  It can be a challenging process at times, but I find a great deal has opened up in my dancing as I developed a willingness to move with the music and move to more types of music.  Here are a few things that helped for me:

Stop and Listen

One of the things that locks us into old patterns is jumping the gun because we feel like we have to move immediately.  When they connect with a partner, most people will start in dancing almost immediately because waiting could create the dance equivalent of an uncomfortable silence.  Starting simply with pulsing to the music and letting the music fill that silence does a lot, both for the musicality of the dance and for making the partnership feel like you are on the same page.

Move By Yourself

In dance classes, when I put on a swing song and ask people to move on their own, inevitably, some percentage of the class will start doing nothing but 6 and 8-count footwork in place.  The whole of the music is there for the taking but they have become so deeply patterned that the first instinct is to do something completely by rote.  As you spend time just getting used to moving alone, you can put more focus on deepening the relationship between your body movement and the music.  The stronger that relationship gets, the more you will be able to take it back into a partnership.  This tends to involve a lot of trial and error and may be uncomfortable at times, but the dance rewards are well worth the effort.

Find Transitions

If I’m DJing a mixed genre night and I want to go from funk to charleston, it would be a rather jarring transition in most cases to do so in one song.  If I find an intermediary song or two that allows me to shift the genre over time rather than a straight change, the energy of the night can be maintained and dancers are better primed for the genre I’m heading towards.  The same goes for your body and your own dance development.  Knowing where you are and working towards other styles of movement piece-by-piece allows you to make use of the resources you already have.  If you like dancing to neo-swing and want to get a feel for vintage, try starting with neo, moving to more modern swing bands, and then working your way back to vintage music.  Whether or not your dancing “feels right” to the music or feels jarring will be a good indicator of when you’ve got it and are in a solid position to expand your comfort zone further.

So the next time you think the music sucks, take a minute and consider how your dancing may or may not line up with the music.  You certainly don’t have to like anything you don’t want to, but if you are willing to step outside of your comfort zone you might find that you can enjoy dancing to something that didn’t grab you at first.  And if you’re of the “I’ll dance to anything” variety, you can use the same tools to deepen your connection with a variety of musical genres and find deeper inspiration in the music.  Whatever your choices, just keep in mind that your musical taste is often as much or more about how the music makes you feel than it is about the music itself.  And whatever makes you feel like you want to dance, start there, and you can use it to grow beyond.

When “Relax” Doesn’t Work (and 3 simple things that do)

tight stone fist

“relax”

“Relax”

“RELAX”

I cringed a little watching this exchange between a massage therapist and a client. The massage therapist was trying to get her client to release tension in her arm. The woman on the table was having trouble relaxing and the massage therapist was becoming frustrated by the client’s lack of response. The client, not too surprisingly, seemed less and less relaxed as the therapist became louder and more insistent.

I have seen similar situations play out in dance classes where well-meaning instructors have created traumatic situations for students by pushing them to relax. I have talked to students who were reduced to tears after a private lesson where they were just told over and over to relax. And I recently had a student who really needed to relax thank me for finding more active release-oriented ways to cue her because a previous ballroom teacher had essentially beaten her over the head with the word “relax” to the point where she hated/feared hearing it.

“Relax” can be an extremely difficult instruction to execute. It seems a great many instructors, students, and people in general don’t have alternative strategies to try when “relax” isn’t effective. So when “relax” doesn’t work, they don’t have a backup wording and just keep saying the same thing that didn’t work the first time. Then they go on repeating “relax” like a mantra until they give up or manage or contort themselves into something that looks close enough that they can move on.

What makes “relax” so hard?

For starters, context. People typically get told to relax in situations where they are already tense, meaning they are under some sort of stress or sense of danger. Telling someone to relax in such a situation is essentially asking them to turn off a defense mechanism when they feel threatened. Frequently, people who are tense because of some fear of judgement end up tensing even more when told to relax because they fear being unable to comply and being judged further.

Relax is also a fairly complex concept, when you think about it. Not only does it involve a change in physical state, but also a mental/emotional shift. And for relaxing to make sense to your nervous system, you need to view your current surroundings as non-threatening. If any of these tensions are habitual, it can even be difficult to tell that you are tense in the first place. With all these factors involved, relax becomes more a state of being than a simple action.

Many people seem to conceptualize relax as the absence of doing something. In the US, the tendency to fill our lives with doing things can make the idea of relaxing seem to equal doing nothing or even being viewed as a negative. Rather than viewing relaxation as a lack of doing, it can be far more productive to approach it as an active releasing of tension. The following few ways can help you to physically and mentally achieve relaxation more effectively than just thinking “relax.”

Breathe

breathelungsOne of my first cues anytime I find myself tense is to extend my breathing. Taking a longer breath, and particularly a longer exhale, activates the relaxation response. Under the sort of duress that causes tension, most of us will shorten or even hold our breath, reinforcing the tension. Deep, slow breathing helps to settle the nervous system and bring it back to a state of ease, leading the muscles to relax without direct, conscious effort.

You can also direct breath towards particular areas that need help relaxing. Shoulder tense? Try focusing on the area in your chest near that shoulder and imagine directing your breath to it. The expansion of the lungs is a great way to passively expand muscle groups and give them more space to settle into more comfortable and relaxed positions.

Think Down

The body responds much better to simple directional ideas than it does to complex concepts like “relax.” The end goal of relaxing can often be achieved by thinking about letting the arms (or whatever body part) sink down.

melting_womanIn many dance contexts I’ve seen teachers repeatedly asking students to relax their arms, often with minimal to moderate success. Often, this arm tension is based on the idea that someone needs to hold their own arms up. So a great deal of tension is a result of fighting gravity to keep the arms at some specific height. By thinking about allowing the arms to sink down, the body can surrender to the effects of gravity and work with it, rather than constantly fighting it. I often use the idea of melting like candle wax to enhance this effect in relaxing. Because a relaxed arm will more effectively transfer motion, this sort of release is integral to creating natural connection in dancing.

ghostbusters-floating-dana
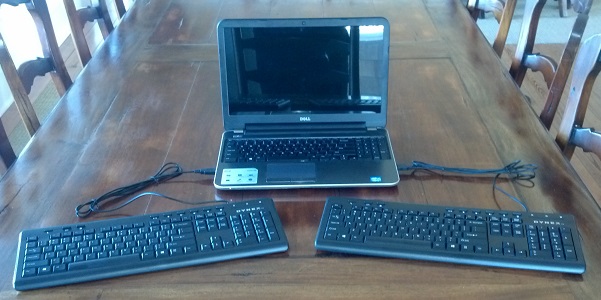
I see the same effect on my Rolfing® table where many people’s bodies tense away from the table almost as if they could levitate themselves by sheer force of will. When I prompt them to recognize that the table can support their weight and to let themselves sink into that support, their bodies relax and their mental state follows suit shortly after. In standing, a similar effect is achievable by becoming aware of the bones in your body and allowing weight to carry through bones rather than be held up by muscle.

Tense & Release

One of the more counter-intuitive moves for relaxation is to tense up first. Most of us, when told to relax, will aim to go directly towards some sort of relaxing attempt. stress ballHowever, it can end up more effective to tense muscles first, hold that tension for a few seconds, and then allow them to relax. In essence, taking yourself into greater tension allows for a better release.

Because many of us carry constant tensions, it can be easy for the brain to begin filtering out these sensations. I often hear people remark that they had no idea they were tense in so many places. By creating a conscious tension in the muscle first, the difference between tense and relaxed can become more apparent, which helps you feel yourself relax. This technique is also used by some physical therapists, terming it Progressive Muscle Relaxation, to treat general anxiety issues.

The 3 ideas above are just starter ideas, feel free to modify them or come up with your own. The more tools you have, the more you can help someone else relax or have options to try when someone tells you to relax.

In any case, keep in mind that attempting to produce a relaxed state involves physical, mental, and emotional aspects. Shifting any one aspect can help to shift the whole.  So when you are having trouble relaxing, focus on a simpler version of it, releasing a part of the body, slowing your breathing, calming your thoughts, instead of trying to do everything at once. And just like working out a muscle, the more you work with these ideas, the stronger they become and the more readily they will help you to achieve relaxation.

Rolfing® as an Alternative to Corticosteroid Injections

There has been a lot in the news recently about the outbreak of fungal meningitis linked to contaminated steroid injections.  With the increasing industrialization of our health care system, we as patients and our doctors as providers are becoming more removed from direct knowledge of the drugs we take to manage pain.  I am often surprised at the willingness Americans have to pop a synthetic pill or go under the surgical knife as a first treatment rather than a last resort to dealing with pain.  There are many options that exist today which can treat the actual causes of physical pain and provide a number of other health benefits as well.  Rolfing® can help provide long-term relief from issues like back pain by addressing not just the symptom but the underlying structural causes and it does so without the use of drugs.

Rolfing is a therapy based on hands-on manipulation of fascia, the connective tissue that forms ligaments and tendons in the body.  In contrast to steroid injections which work by limiting the immune system response and dampening inflammation, Rolfing works by creating space in the body allowing for better movement and circulation and allowing inflammation to clear on it’s own.  Rolfing has also grown over the years to encompass elements of addressing the nervous system and movement patterns that reinforce painful posturing or movements.  Rolfing also involves no injections or pharmaceuticals so there is no need to worry about current issues like life-threatening infections from contaminated steroid injections.  Beyond not being linked to infections, there are a numbers of reasons that Rolfing is a much more effective therapy to consider.

Rolfing provides additional health benefits

Steroid injections and a great many other standard medical treatments are designed with insurance in mind to directly treat a singular issues and only that issues.  Rolfing, rather than being simply a quick fix is based around the idea of fostering health rather.  A Rolfed body stands taller and moves more fluidly.  Clients often report feeling more like themselves and most note improvements in sleeping and energy levels through a course of Rolfing sessions.  Rolfing also frequently helps the body to strengthen it’s own structural support leading to a reduction in in frequency or severity of future injuries.

Rolfing does not come with a list of side effects

A quick check of WebMD for methylprednisolone acetate (the injection linked to cases of contamination) reveals a list of rather nasty side effects including vomiting, dizziness, trouble sleeping, appetite changes and pain/redness/swelling at the injection site.  While I think it is fair to say that many of these side effects are probably preferable to months of chronic pain, there are also treatments available such as Rolfing that don’t come with a list of side effects.

Rolfing involves the personal touch of a local provider

With the increasing industrialization of pharmaceuticals, we are much less likely to have a personal relationship with our prescription provider than we did 20 years ago.  With the myriad drug interactions out there, it becomes much easier to miss something if your provider is a large remote company.  A Rolfer will work with you one-on-one and typically spends an hour or more with you on each treatment.  And a Rolfer will treat you as an individual whole person and adjust treatments on the fly according to your needs.

None of this is to say that corticosteroids are inherently bad.  I have known people who had great results with them, and I have also helped a lot of clients who didn’t respond to steroid injections.  Any treatment has advantages and drawbacks and I think it is important for people concerned about their own health to consider the alternatives and weigh the benefits of allopathic treatments versus the benefits of other modalities.

For more information on Rolfing therapies in the Raleigh/Durham area, you can visit RaleighRolfing.com.  To learn more about Rolfing in general or find a Rolfer in your area, you can visit the Rolf Institute of Structural Integration website at Rolf.org.

Contrasting Up and Down Orientation – Part 1: Fred and Gene

It’s Gene Kelly’s 100th birthday today and it seemed like a good time to write a post that has been bouncing around in my head for a long time now. Lots of media outlets are already talking about Gene in eloquent glowing terms, so I’ll forgo that in favor of talking about one of the things that I believe made Gene an iconic dancer, his orientation to the ground.

Every one of us falls naturally somewhere on a sliding scale of orienting more to the moving up or moving down. Some of this is natural orientation, some influenced by culture, some influenced by training. You can particularly see it in yourself and others in how which direction we resource in a moment of stress. When suddenly forced to avoid someone on the street, do you tend more to duck (down) or jump (up). We all have some ability to access both but in almost all cases, we have a preferred orientation that we use more than the other.

I think at first, the concept of how up and down preference affects movement can be difficult to discern, so I’d like to present one of my favorite bits of contrasting film for this. “The Babbitt and the Bromide” from the film Ziegfield Follies features the film icons of up and down orientation, Fred Astaire and Gene Kelly, dancing together. Dancing side by side, you can start to see how they use the ground differently or rise differently. They even tend to shake hands in different ways (Fred reaching over top, Gene reaching from closer to the waist). I recommend watching this at least once before reading on to form your own impressions first.

Obviously both men are incredible dancers, but if you look for it, you can begin to see how their up or down orientation leadsthem to look better performing certain motions or moving in certain ways. Fred tends to float through the top of his leaps where Gene may not float as much but seems to land more solidly. Towards the end when they perform the ballroom and lindy-ish sections you can see each out of his element contrasted to the other in his. Gene doesn’t float through a waltz the way Fred can and Fred does’t achieve the athletic look that Gene does in the next section. Gene’s legs hold him up and drive him around the floor where Fred’s almost seem to hang from his body at times.

This is not to say that one or the other is correct, but rather to illustrate that both orientations have their uses, their pluses and minuses. As dancers I believe a great goal is to develop the use of both, to be “human being suspended between earth and sky” in the words of Hubert Godard. Fred and Gene are both incredible dancers because they can use both up and down in their dancing, but at the same time, their preferences to use one more than the other helps to make them unique, intriguing, and iconic.

Continues in Part 2: Cultural Differences

Tag Cloud